- Transfer application data between PeopleSoft databases.
- Move PeopleSoft databases across operating systems and database platforms.
- Execute Structured Query Language (SQL) statements against any PeopleSoft database, regardless of the underlying operating system or database platform.
- Control database security and access.
- Create, edit, and run scripts.
These scripts may include any combination of SQL commands and PeopleSoft Data Mover commands for exporting and importing data.
Data Mover Modes
- Regular mode.
Most of the time, you use regular mode. To sign in to regular mode, enter your PeopleSoft user ID and password during sign-in. In regular mode, all commands are valid.
- Bootstrap mode.
In bootstrap mode, you use a database access ID and password when signing in. Typically, you use bootstrap mode for database loading, because no PeopleSoft security tables are established yet. You also use bootstrap mode for running some security commands, such as ENCRYPT_PASSWORD
Data Mover Script Commands
ENCRYPT_PASSWORD
EXPORT
IMPORT
REM
REMAR
RENAME
REPLACE_ALL
REPLACE_DATA
REPLACE_VIEW\
RUN
SET
SET IGNORE_ERRORS
SET BASE_LANGUAGE
SWAP_BASE_LANGUAGE
- Regular mode.
Pages
Monday, July 25, 2011
PeopleSoft Data Mover Overview
Sunday, July 24, 2011
Peoplesoft Process scheduler PT8.50
Connect on your front end application with PS user (HCM, VP1 for other applications).
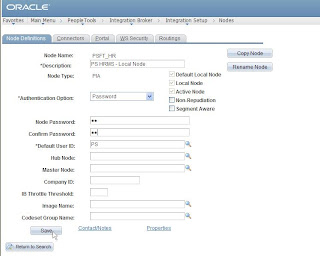
1. Define your local node with password authentication
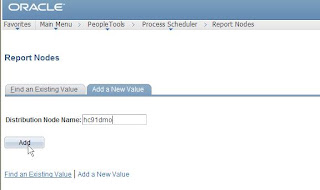
 2. Create a report nodes
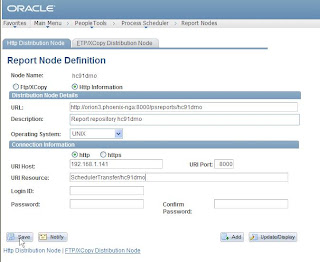 => note, leave the LoginId and password blank, otherwise you could receive the following error message when posting process reports.
From stdout file (prcs/domain/LOGS) :
From DSTAGNT_xxxx.LOG (prcs/domain/LOGS) :
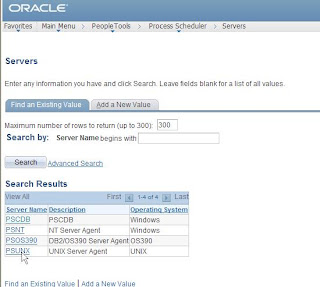
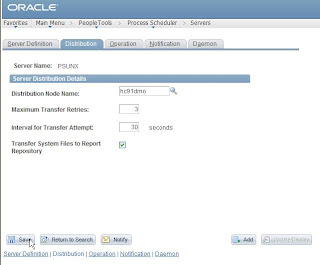
3. Add the report node to the process server (here PSUNX) :
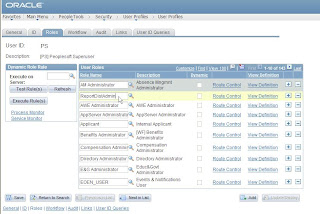
 4. Add the ReportDistAdmin role to the user used to manage the process scheduler (to start it, defined in the process scheduler configuration file) - here PS :
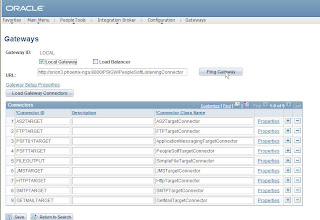
 4. You can define the local gateway, based on the webserver url, and load the connector :
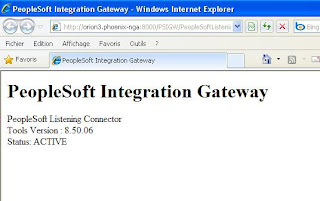
 Ping to confirm the input
 5. Add the local node to your Gateway
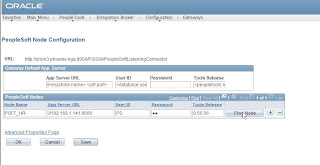 Ping the local node to confirm the input
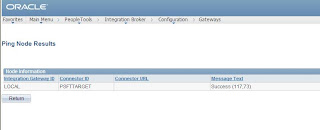 6. Create a new process scheduler, configure and start the process scheduler
7. Now, you should be able to run process against the process server defined above
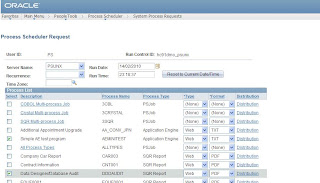
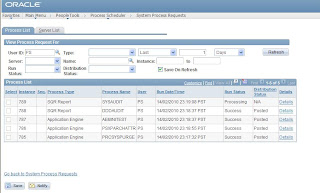
1. Define your local node with password authentication
 2. Create a report nodes
 => note, leave the LoginId and password blank, otherwise you could receive the following error message when posting process reports.
From stdout file (prcs/domain/LOGS) :
NULL HTTP response - check Report Repository web server. (63,70)
=================================Error===============================
 Message:       Unable to post report/log file for Process Instance: 868, Report Id: 714
          Process Name: PSXPARCHATTR, Type: Application Engine
          Description: XML Publisher Archive
          Directory: /home/psadm2/ps/pt/8.50/appserv/prcs/PRCSDOM/log_output/AE_PSXPARCHATTR_868
=====================================================================
From DSTAGNT_xxxx.LOG (prcs/domain/LOGS) :
PSDSTSRV.1982 (7) [02/28/10 11:32:52 PostReport](2) =====================================================================
PSDSTSRV.1982 (8) [02/28/10 11:32:52 PostReport](3) Number of new entries to process: 1
PSDSTSRV.1982 (8) [02/28/10 11:32:52 PostReport](3)   1.  Process Instance: 868/Report Id: 714/Descr: XML Publisher Archive
PSDSTSRV.1982 (8) [02/28/10 11:32:52 PostReport](3)                      from directory: /home/psadm2/ps/pt/8.50/appserv/prcs/PRCSDOM/log_output/AE_PSXPARCHATTR_868
PSDSTSRV.1982 (8) [02/28/10 11:32:52 PostReport](1) PSJNI: Java exception thrown: java.io.IOException: Stream closed.
PSDSTSRV.1982 (8) [02/28/10 11:32:52 PostReport](3)     HTTP transfer error.
PSDSTSRV.1982 (8) [02/28/10 11:32:52 PostReport](3)      Post Report Elapsed Time: 0.0200
PSDSTSRV.1982 (9) [02/28/10 11:33:07 PostReport](3) Number of new entries to process: 1
PSDSTSRV.1982 (9) [02/28/10 11:33:07 PostReport](3)   1.  Process Instance: 868/Report Id: 714/Descr: XML Publisher Archive
PSDSTSRV.1982 (9) [02/28/10 11:33:07 PostReport](3)                      from directory: /home/psadm2/ps/pt/8.50/appserv/prcs/PRCSDOM/log_output/AE_PSXPARCHATTR_868
PSDSTSRV.1982 (9) [02/28/10 11:33:07 PostReport](1) PSJNI: Java exception thrown: java.io.IOException: Stream closed.
PSDSTSRV.1982 (9) [02/28/10 11:33:07 PostReport](3)     HTTP transfer error.
PSDSTSRV.1982 (9) [02/28/10 11:33:07 PostReport](3)      Post Report Elapsed Time: 0.0200
PSDSTSRV.1982 (9) [02/28/10 11:33:07 PostReport](1) =================================Error===============================
PSDSTSRV.1982 (9) [02/28/10 11:33:07 PostReport](1)      Unable to post report/log file for Process Instance: 868, Report Id: 714
PSDSTSRV.1982 (9) [02/28/10 11:33:07 PostReport](2)           Process Name: PSXPARCHATTR, Type: Application Engine
PSDSTSRV.1982 (9) [02/28/10 11:33:07 PostReport](2)           Description: XML Publisher Archive
PSDSTSRV.1982 (9) [02/28/10 11:33:07 PostReport](2)           Directory: /home/psadm2/ps/pt/8.50/appserv/prcs/PRCSDOM/log_output/AE_PSXPARCHATTR_868
PSDSTSRV.1982 (9) [02/28/10 11:33:07 PostReport](2) =====================================================================
3. Add the report node to the process server (here PSUNX) :

 4. Add the ReportDistAdmin role to the user used to manage the process scheduler (to start it, defined in the process scheduler configuration file) - here PS :
 4. You can define the local gateway, based on the webserver url, and load the connector :
 Ping to confirm the input
 5. Add the local node to your Gateway
 Ping the local node to confirm the input
 6. Create a new process scheduler, configure and start the process scheduler
------------------------------------------------------------
Quick-configure menu -- Scheduler for Database: hc91dmo
------------------------------------------------------------
      Features                      Settings
     ==========                    ==========
  1) Master Schdlr  : Yes     5) DBNAME     :[hc91dmo]
  2) App Eng Server : Yes     6) DBTYPE     :[ORACLE]
                              7) PrcsServer :[PSUNX]
                              8) UserId     :[PS]
                              9) UserPswd   :[PS]
                             10) ConnectID  :[people]
                             11) ConnectPswd:[peop1e]
                             12) ServerName :[]
      Actions                13) Log/Output Dir:[%PS_SERVDIR%/log_output]
     =========               14) SQRBIN     :[%PS_HOME%/bin/sqr/%PS_DB%/bin]
  3) Load config as shown    15) AddToPATH  :[%PS_HOME%/cblbin]
  4) Custom configuration
  h) Help for this menu
  q) Return to previous menu

Enter selection (1-15, h, or q): 3
Loading validation table...
  setting DBName=hc91dmo
  setting DBType=ORACLE
  setting UserId=PS
  setting UserPswd=PS
  setting ConnectId=people
  setting ConnectPswd=peop1e
  setting ServerName=
  setting PrcsServerName=PSUNX
  setting Log/Output Directory=%PS_SERVDIR%/log_output
  setting Add to PATH=%PS_HOME%/cblbin
  setting SQRBIN=%PS_HOME%/bin/sqr/%PS_DB%/bin
New CFG file written with modified Startup parameters

Log Directory entry not found in configuration file.
Setting Log Directory to the default... [PS_SERVDIR/LOGS]
Spawning enabled for server PSDSTSRV.
Configuration file successfully created.
CFG setting changes completed, loading configuration...
Process Scheduler Server configuration complete.


-------------------------------------------
PeopleSoft Process Scheduler Administration
-------------------------------------------

   1) Start a Process Scheduler Server
   2) Stop a Process Scheduler Server
   3) Configure a Process Scheduler Server
   4) Create a Process Scheduler Server Configuration
   5) Delete a Process Scheduler Server Configuration
   6) Edit a Process Scheduler Configuration File
   7) Import an existing Process Scheduler Configuration
   8) Show Status of a Process Scheduler Server
   9) Kill a Process Scheduler Server
  10) Clean IPC resources of a Process Scheduler Domain

   q) Quit

Command to execute (1-10, q) : 1


Database list:

  1)  hc91dmo

Select item number to start: 1

No Archive subdirectory, creating it...
No psprcs.cfg in the Archive subdirectory, creating it...

Starting Process Scheduler Server PSUNX for Database hc91dmo ...

Booting all admin and server processes in /apps/psoft/hc91/appserv/prcs/hc91dmo/PSTUXCFG
INFO: Oracle Tuxedo, Version 10.3.0.0, 64-bit, Patch Level (none)

Booting admin processes ...

exec BBL -A :
        process id=24737 ... Started.

Booting server processes ...

exec PSMSTPRC -o ./LOGS/stdout -e ./LOGS/stderr -A -- -CD hc91dmo -PS PSUNX -A start -S PSMSTPRC :
        process id=24739 ... Started.
exec PSAESRV -o ./LOGS/stdout -e ./LOGS/stderr -- -CD hc91dmo -S PSAESRV :
        process id=24764 ... Started.
exec PSAESRV -o ./LOGS/stdout -e ./LOGS/stderr -- -CD hc91dmo -S PSAESRV :
        process id=24772 ... Started.
exec PSAESRV -o ./LOGS/stdout -e ./LOGS/stderr -- -CD hc91dmo -S PSAESRV :
        process id=24781 ... Started.
exec PSDSTSRV -o ./LOGS/stdout -e ./LOGS/stderr -p 1,600:1,1 -sPostReport -- -CD hc91dmo -PS PSUNX -A start -S PSDSTSRV :
        process id=24789 ... Started.
exec PSPRCSRV -o ./LOGS/stdout -e ./LOGS/stderr -sInitiateRequest -- -CD hc91dmo -PS PSUNX -A start -S PSPRCSRV :
        process id=24799 ... Started.
exec PSMONITORSRV -o ./LOGS/stdout -e ./LOGS/stderr -A -- -ID 135074 -PS PSUNX -S PSMONITORSRV :
        process id=24811 ... Started.
8 processes started.


-------------------------------------------
PeopleSoft Process Scheduler Administration
-------------------------------------------

   1) Start a Process Scheduler Server
   2) Stop a Process Scheduler Server
   3) Configure a Process Scheduler Server
   4) Create a Process Scheduler Server Configuration
   5) Delete a Process Scheduler Server Configuration
   6) Edit a Process Scheduler Configuration File
   7) Import an existing Process Scheduler Configuration
   8) Show Status of a Process Scheduler Server
   9) Kill a Process Scheduler Server
  10) Clean IPC resources of a Process Scheduler Domain

   q) Quit

Command to execute (1-10, q) :
7. Now, you should be able to run process against the process server defined above


VP1/PS User ID Password Change
To change the password for VP1/PS, following steps are to be executed.
- Change VP1/PS Password online. Login to the appropriate PeopleSoft instance online, PeopleTools > Security > User profile open VP1/PS profile and change the password.
- Shutdown appserver and process scheduler server
- Change the password for VP1/PS in Application Server configuration using psadmin.
- Change the password for VP1/PS in Process Scheduler Server configuration using psadmin.
- Start appserver and process scheduler server
- Web profile Configuration – Go to PeopleTools > Web Profile – open up the related profile and update the password in the security tab.
- Change the VP1/PS password in Integration broker configuration file. Go to PeopleTools > Integration Broker > Gateway open the local Gateway – Click on properties link, enter user id and password and in the gateway configuration file change VP1/PS password.
Friday, July 22, 2011
Shut down commands
--AIX--
Shutdown
shutdown ( 60 sec)
 shutdown now (shutdown 60 sec)
shutdown -F (force shutdown)
Reboot
shutdonw -r (reboot and flush cache to disk)
shutdonw -Fr (force reboot)
reboot (Not flush cache to disk)
--HP--
Shutdown
shutdown -hy 0 (Force shutdown 0 sec)
init 0
Reboot
shutdown -ry 0 (Force restart 0 sec)
reboot
--Linux--
Shutdown
shutdown -h now (Force shutdown 0 sec)
init 0
halt
poweroff
Reboot
shutdown –r now (Force restart 0 sec)
reboot
init 6
--Sun--
Shutdown
shutdown -i5 -y -g0
sync;sync;init 5
poweroff
Reboot
shutdown -i6 -y -g0
sync;sync;init 6
reboot
Credit: Knowledge Management IT for you: Unix shutdown/restart command (AIX,HP-UX,Linux,Sun)
Under Creative Commons License: Attribution
Shutdown
shutdown ( 60 sec)
shutdown -F (force shutdown)
Reboot
shutdonw -r (reboot and flush cache to disk)
shutdonw -Fr (force reboot)
reboot (Not flush cache to disk)
--HP--
Shutdown
shutdown -hy 0 (Force shutdown 0 sec)
init 0
Reboot
shutdown -ry 0 (Force restart 0 sec)
reboot
--Linux--
Shutdown
shutdown -h now (Force shutdown 0 sec)
init 0
halt
poweroff
Reboot
shutdown –r now (Force restart 0 sec)
reboot
init 6
--Sun--
Shutdown
shutdown -i5 -y -g0
sync;sync;init 5
poweroff
Reboot
shutdown -i6 -y -g0
sync;sync;init 6
reboot
Credit: Knowledge Management IT for you: Unix shutdown/restart command (AIX,HP-UX,Linux,Sun)
Under Creative Commons License: Attribution
Thursday, July 21, 2011
Patch Installation
Step 1: Download the Patch
Step 2: Shut down the all servers(application servers, web servers, Process Scheduler servers, and EM Agents that are currently running)
Step 3: Back up your existing PSHOME folders
Step 4: Install Patch Files Run \pt85016\cd85016\Disk1\setup.bat (Example)
Step 5: Update Your Database with Patch Version Information. Using People Tools 8.50.16 launch
Data Mover and logon to your database as a PeopleSoft User Run the script
<PS_HOME>\scripts\PTPATCH.DMS
Step 6: Install Database Changes Included in this Patch
6.1. Using People Tools 8.50.16, launch Application Designer, and sign on to the database as a PeopleSoft User.
6.2. Select <Tools>, <Copy Project>, <From File>
6.3. Enter <PS_HOME>\projects and select
PATCH850 from the list of projects.
6.4. Select <Options> and highlight the languages <Common> and <English> ONLY.
6.5. Select <Copy> to begin copying updated
People Tools objects to your database.
Step 7: Load People Tools Messages and Data Project
7.1. Logon to Data Mover in bootstrap mode as the database owner using PT 8.50.16
7.2. Run <PS_HOME>\scripts\MSGTLSUPG.DMS to load the updated messages into your
Database
7.2.1. Note: If message catalog changes have not been made in PT 8.50 by the time this
Patch is released, the MSGTLSUPG.DMS script may not exist in the
<PS_HOME>\scripts folder and this entire step can be skipped.
7.3. Close Data Mover.
Step 8: Completing Installation and configuring this People Tools Patch9.1. Reinstall any products in
use from the following folders:
8.1.1. Change Assistant: <PS_HOME>\setup\PsCA 9.1.2.
People Soft Internet Architecture (PIA): <PS_HOME>\setup\ PsMpPIAInstall9.1.2.1. Choose
'Redeploy PeopleSoft Internet Architecture' when prompted
Step 9: Purge all App Server and Web Server cache. Re-start your Application server(s), Batch
server(s), Web Server(s), and EM Agents
-----------------------------
Step By Step: PeopleTools 8.51.0 to 8.51.11
July 14, 2011 — digitaleagleI had hoped to be able to get the PeopleTools Testing Framework posts complete before I proceeded to installing the latest update patch for PeopleTools. After constantly reading that you need to update to the latest for PTF, I decided I was being silly, and I broke down and went through the update.
Here’s what I did:
First, I downloaded the update from Oracle Support:
First, I downloaded the update from Oracle Support:
Update: 866843
At this point, I probably could have done the Change Assistant package. I chose to do the full install version because it would complement the instructions that I already have.
Stop the Services
Next, I stopped the services. For me, (since I am on a single-instance, single-user system) I just pulled my start up script out of the start up folder.

When I rebooted, everything should be stopped. To avoid rebooting, make sure that you have stopped all:
- App Servers
- Process Schedulers
- Web Servers
- PSEM Agents
Just a thought: I would clear the cache on your servers – app, batch, and web – to make sure that everything stopped as it should. You might visually scan task manager also.
Backup
Now, keep in mind that I don’t take any responsibility for mistakes that you make or problems with anything. Hey, this is free information. So, your on your honor — back up just in case. I have a VM Instance, and I just backed up the whole machine.
Installer
When it asks for the license code, enter it in the blanks. If you are like me and didn’t write down the code, look up the PeopleTools license code for your platform here.

Then, you choose which pieces of the system you want in this particular install. For me, because it is a single server installation, I need all of the pieces.

Stamping New Version in Database
Next, you need to stamp the database with the new PeopleTools version to show the file system and database are in sync. You simply run the ptpatch.dms data mover script in the scripts directory of your PeopleSoft Home. (I just logged in as PS, not boot strap mode).
Database Changes/App Designer Project
The next major step is to install the App Designer project. This is copying the meta data into the database.
Once it is loaded, Build the project. You should be able to use the Build > Project option.
For some reason, that option wouldn’t work for me. So, I just built each record manually. Here are the records I had to build:
- PRCSDEFN
- PSDSSECMAPMAIN
- PSGATEWAY
- PSPMSYSDEFAULTS
- PSTRIGGERDEFN
- QUERY_RUN_CNTRL
- SCHDLITEM
Note: if you select Build project, you should see the full list of records in the Scope.
Loading Messages
Messages from the message catalog do not copy via a project when copying from a file. So, we have to use this data mover script.
Reinstalling Tools
PIA: I had just deleted the whole PIA Home thinking that I was going to reinstall. I wish I had just deleted the cache and used the re-deploy option. Oh, well.
Then, clear App Server cache. Since I did that at the beginning, I don’t have to worry about that.
Finally, I placed my boot script back in the Startup directory, and I was good to go after a reboot.

Now, I have a 8.51.11 instance!
------------------------
Method 1:
Go to PeopleTools > Utilities > Administration, in that navigation you will see two links
1. Updates - View All
2. Updates by Release Label
1. Updates - View All
2. Updates by Release Label
Method 2:
Ctrl+J on a page
Method 3:
PSRELEASE,
PS_MAINTENANCE_LOG,
PSSTATUS tables
Method 4:
From Appdesigner or Datamover, go to Help > About
Subscribe to:
Comments (Atom)